
For most of my RTI students, summarizing is a challenge, especially when it comes to identifying key details and boiling our summaries down to the most important information. More often than not, text summaries become text retells, and students lose focus of what’s important. So how do students “boil it down,” and more importantly, how can we make it FUN?
Becoming “Summarizing Superstars” doesn’t happen overnight, so it’s always a challenge to come up with motivating tasks to practice summarizing – tasks that can potentially keep students motivated over the course of a few weeks! High-interest texts are a start, but I try to make the actual tasks fun and engaging, as well. How? Insert: TECHNOLOGY. :)
“Project QR Code” continues with this next technology integration activity.
I gave my students a challenge — we would be creating QR Code chapter summaries for a non-fiction text about mysterious Sumatran tigers, BUT each summary would have to fit on a post-it note and would have to include the five most important key words from the chapter. We would then turn our post-it notes into QR codes and create a summary collage. The students seemed hesitant, but excited with the idea of creating their own QR code summary posters!
“Sum It Up!” Comprehension Strategy
To help students identify what’s most important in the text, I use the “Sum It Up!” strategy. As always, I model the strategy, guide (guide, guide, guide some more), and THEN see if they can do it on their own. It’s the typical “I Do/We Do/You Do” model with a gradual release of responsibility. My RTI students need a lot of hand-holding at first, especially when they realize they’re choosing the incorrect words nine times out of ten. It’s a slow process, but their beautiful summaries and sense of accomplishment in the end makes it all worth it!
With the “Sum It Up!” strategy, students have to first identify key words (5 maximum). This is the hardest part, and we often start in our notebooks so we can brainstorm a list of words without the pressure of choosing just FIVE. To get started, the students first jot down any important words that pop into their head from the chapter. We then revisit the text and hunt for key words. Highlighting and marking up the text are great strategies for spotlighting important words, just as long as the students aren’t “highlighter happy.” In the beginning, I usually do this part with them, or just have them stay away from highlighters so the markings can be erased. (NOTE: If you do close reading with your students, you can make a connection to the “highlighter hunts” you do with close reads!)
I provide students with guiding questions to help them with identifying key words. Students ask themselves the following questions:
- What is the chapter title? (This is a huge clue! Students discover that key words are often hidden inside title since authors create titles based on main ideas!)
- What is this chapter mostly about?
- What words do I see repeated throughout the chapter?
- What are the most important details (vs. the supporting details)?
- Is there background information, extended examples, or author anecdotes that can be left out?
- Is the word I found important to understanding this chapter?
- Could I leave this word out and still understand the chapter?
Once we have a list of potential key words, we look at each one, discuss WHY we think it’s important (students have to defend their words), and then we slowly narrow it down by crossing words out. What’s left are the five most important ones that we can connect together to form a summary.
For the summary-writing stage, I always have students start in their notebooks so they can cross-out and shrink their summaries. The ultimate goal is for it to fit on a post-it note. The post-it note forces students to “boil down” their summaries down to the most important information. (Be patient… usually it takes many tries and a HUGE pile of post-its!)
After, the summaries are successfully recorded on post-it notes, I have my students underline the key words inside their summaries. Their post-it notes are sometimes a mess, so I may have students transfer their summaries (again) to “Sum It Up” graphic organizers (see pictures below). Underlining acts as a self-check to make sure they included all five. (It’s important to note that sometimes there will be less than five key words! It depends on the length of the text or chapter you’re summarizing.)

I often have my students create their own graphic organizers using blank paper so that they know how to develop graphic organizers on their own for future note-taking tasks.
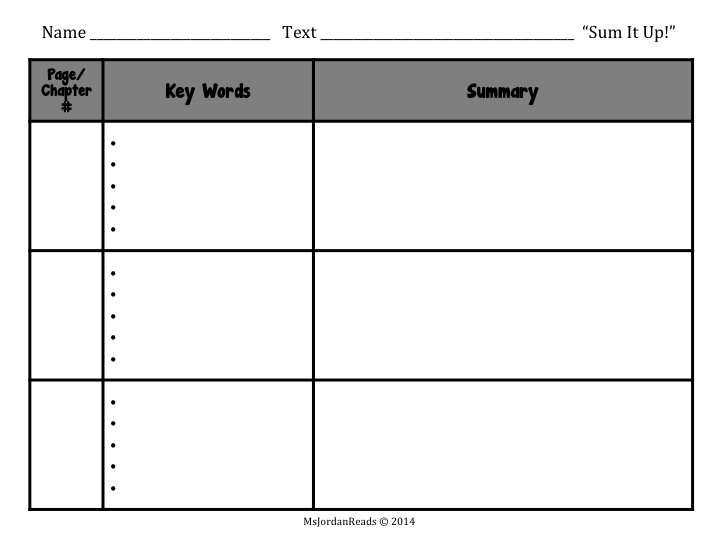
Download this FREE “Sum It Up!” graphic organizer to use with your students! (Click on image)
Eventually, students will be able to do many of these steps in their heads, but until then, it may take lots of step-by-step instruction, drafts, re-writes, and re-teaching. The big thing is for students not to get frustrated!
Creating QR Codes
The culminating QR code project was the “light at the end of the tunnel” for many of my students, so I made sure to leave plenty of time for students to create their QR codes and complete their poster collages.
My favorite QR creator to use with students is QR Code Generator (http://goqr.me/). There are a TON of QR code creator websites out there. Just find the one that works for you!

Using my teacher website, or a bookmark on the iPad, students go to the URL and follow the directions. I have students create the QR codes on the iPad.
Here’s a screenshot of the directions on my classroom website:

Using PicCollage
Students love PicCollage. It’s extremely student-friendly, and it’s a fun way for students to show off their understanding! Students can add their QR codes, photos from the web, text captions, titles, and so much more. Each collage can be customized very easily by the students. Once they are happy with their collages, they can save, share, or email the files. Since my students can’t print from the iPads, they submit it to me via DROPitTOme. The collage can be saved to the iPad’s camera roll, so if you use the DropBox app on the iPad, you can save it there as well.

Looking for a PicCollage tutorial?
- Apps in the Classroom – PicCollage (SchooliPads)
- YouTube Tutorial (Justin Talmadge, SVSD)
- PDF Tutorial (Carrollton-Farmers Branch I.S.D.)
Final QR Code Summary Posters
Here are two more examples of posters my students made. Feel free to scan the QR codes to see their summaries. The chapter summaries are not perfect, but we’re definitely on our way to becoming “Summarizing Superstars.” :)


–
Happy Teaching!


